Build your very own website using Swift - Part 1
| Creating your own nodes → |
|---|
Prerequisites
Requirements:
- Swift 5.2 (or later)
- macOS Catalina 10.15 (or later)
- Some experience in Swift
- Not necessary, but background experience in HTML/CSS and web design will help
Introduction
When programmers hear the word "Swift" they instantly think of iOS apps and Apple. This is because Swift was developed by Apple for iOS, iPadOS, macOS, watchOS, and tvOS. It was designed to take over Objective-C and so far has been doing an excellent job with it.
However, programming languages are constantly changing and improving and Swift is no exception. John Sundell is very popular in the Swift community and last year he released his Publish project that allows you to make static websites using Swift code. In fact, this website that you're reading this tutorial on was built using Publish!
All the hard work is done for us, however, the documentation is still being worked on. Kilo Loco has a great video to help you get started, but I wanted to create a more in depth guide to help you create your very own website from start to finish. At the end of this tutorial, you will have created this website as well as have a decent idea of how to organize your code.
Now this tutorial doesn't go into a whole lot of detail with CSS and HTML because well frankly, it's not my strong point. However, I will show you enough to get you started. Note that even though Publish is written in Swift, we don't do a whole lot of normal Swift code that you normally see and there may be some advanced topics that we will quickly go over without digging in too deep.
With that being said, let's get started. I highly suggest taking a moment to look over the publish repo and getting a bit familiar with what we are dealing with. When you are ready, go ahead and clone the repo. To do that, open terminal, navigate to a directory of your choosing and type in git clone https://github.com/JohnSundell/Publish.git When finished, navigate to the newly created 'Publish' directory that you just cloned then run the terminal command make. This tutorial is split into four different sections, so feel free to take breaks as needed.
Tip: to change directories using terminal commands just type cd /directory/of/your/choosing/
The make command runs the make file that's included in the Publish repo. If you get a permission denied when trying to run this, use the sudo command sudo make and use admin privldeges (assuming you have them). At this point, I'd recommend creating a separate directory to store your own own website. After navigating to your new directory inside your terminal, run the command publish new. This generates a handful of files that is now your new website.
Launching your website
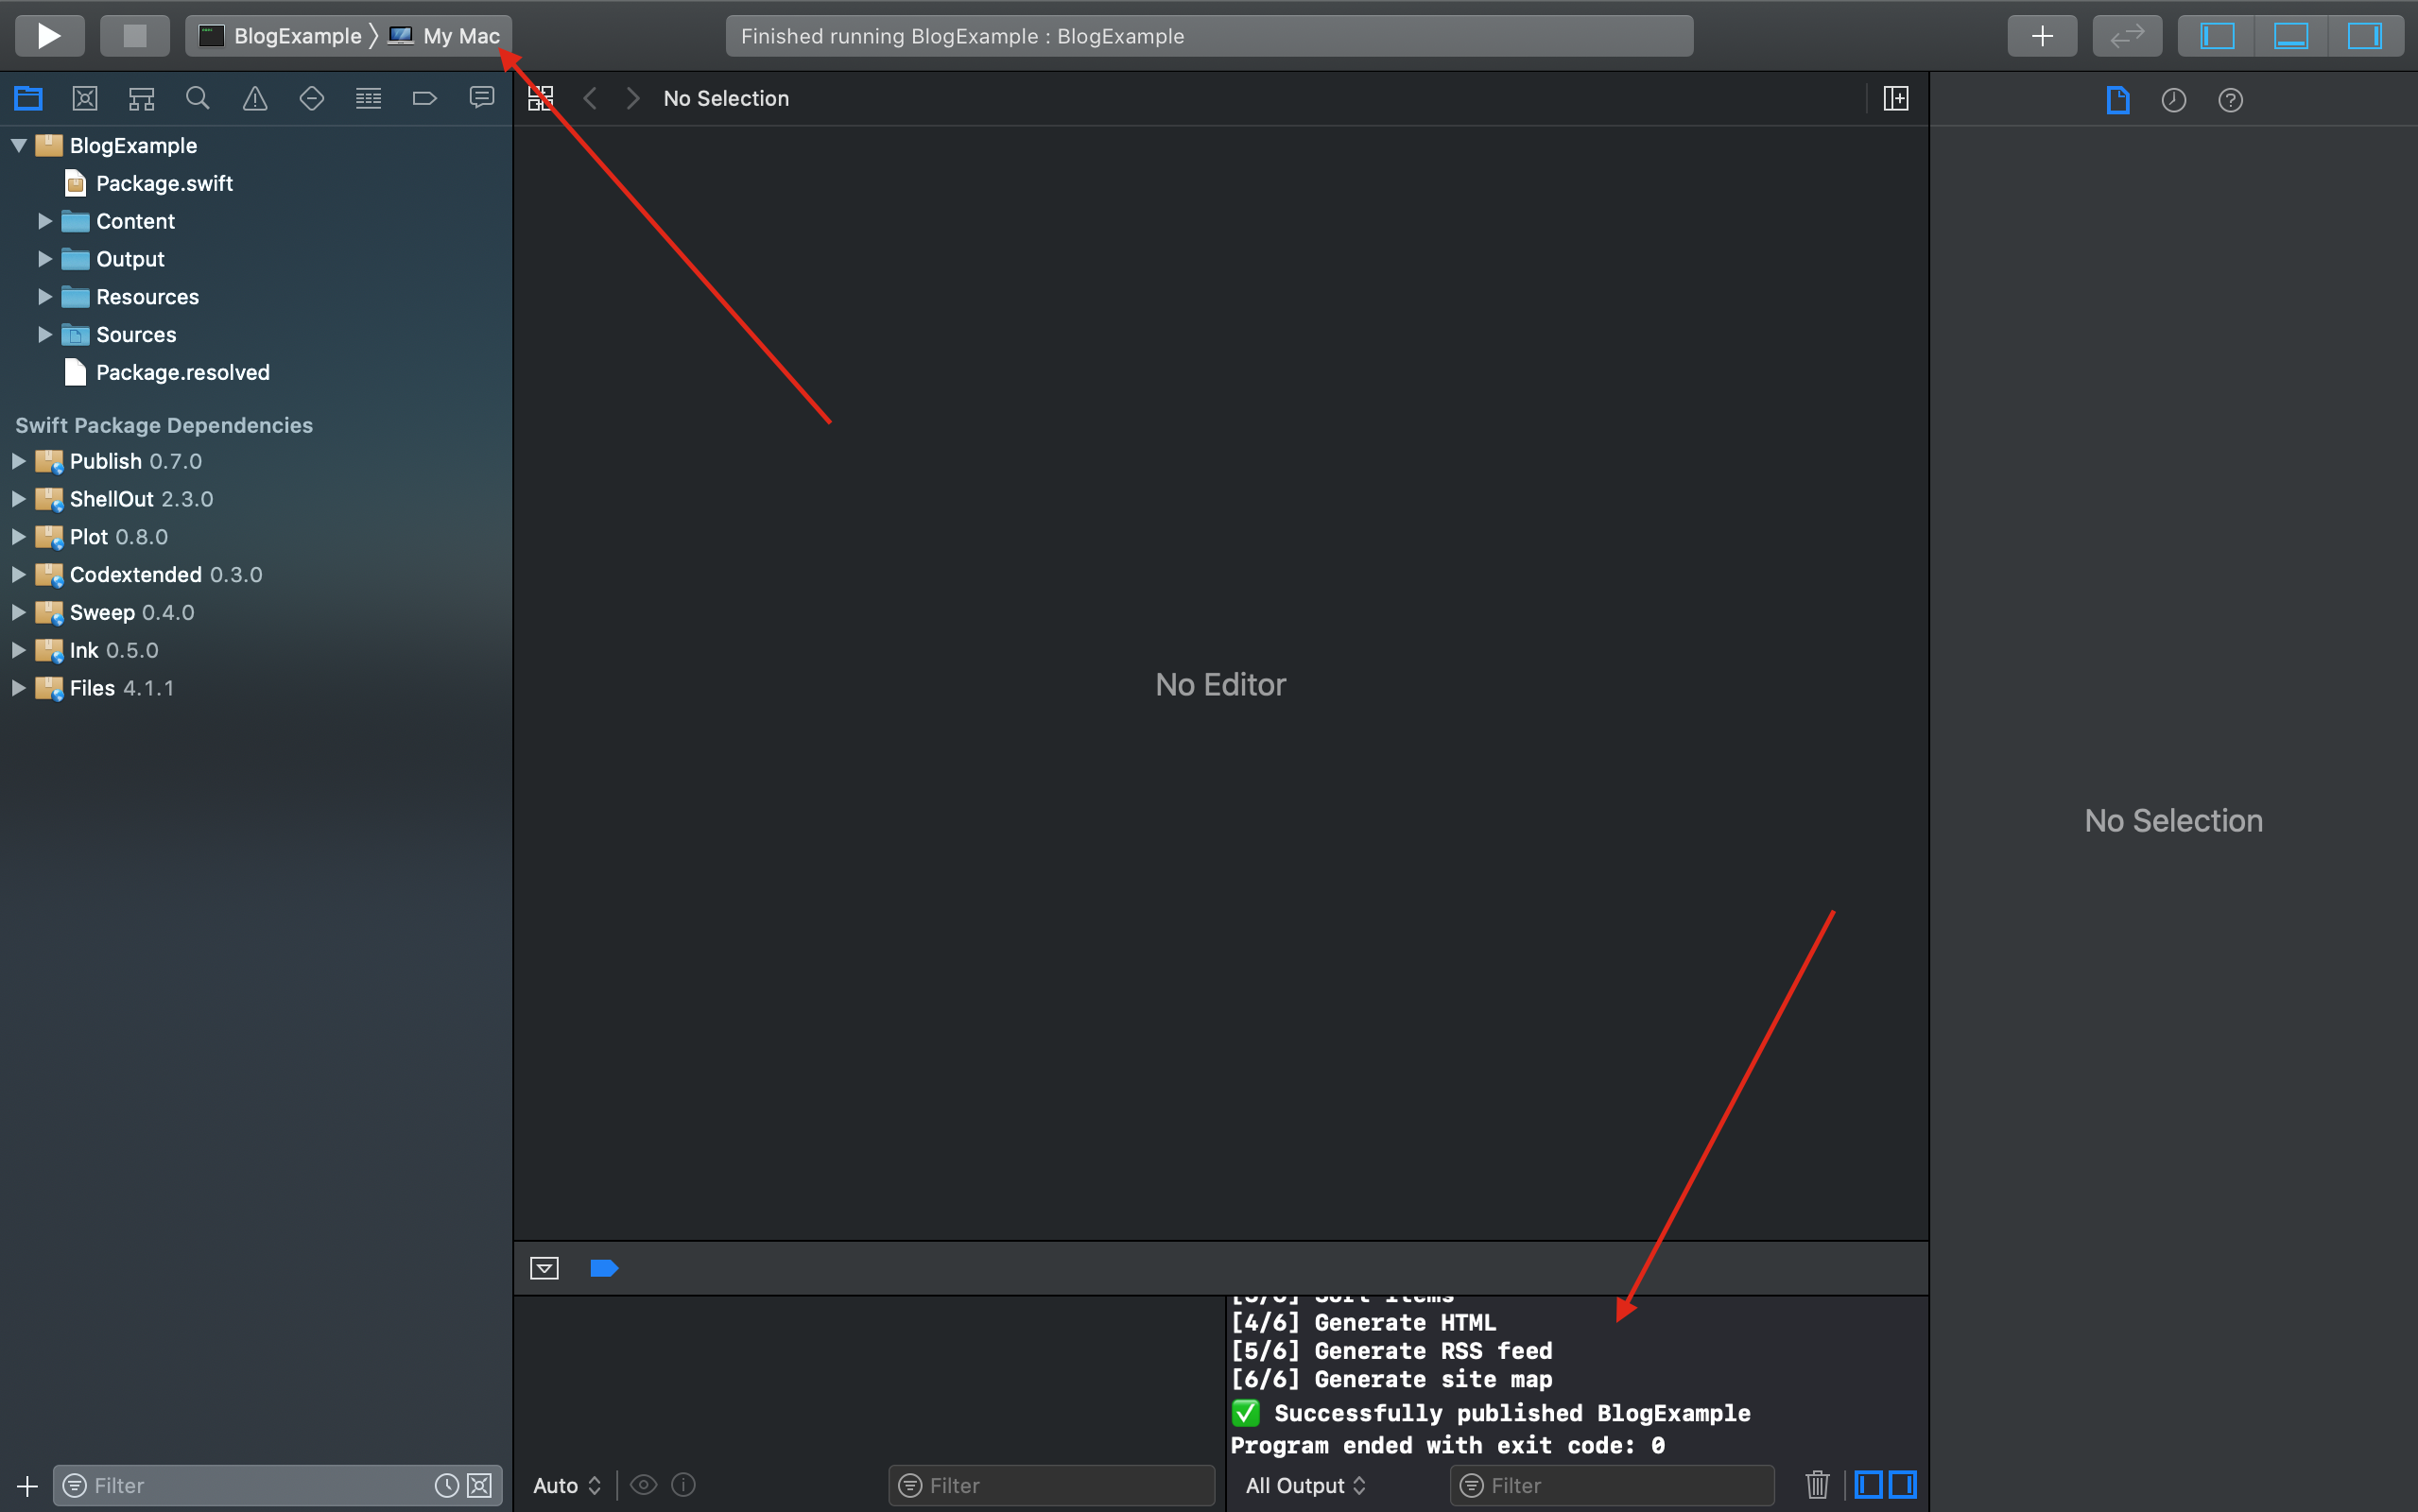
Great! You now have your very first website using Publish! Let's take a look at it, shall we? The first step is to open your website by running open package.swift. Give Xcode some time to install all the dependencies needed. When it's finished, make sure your scheme is selected for your Mac, hit run, and ensure you have a success message. Here's what you should be seeing.
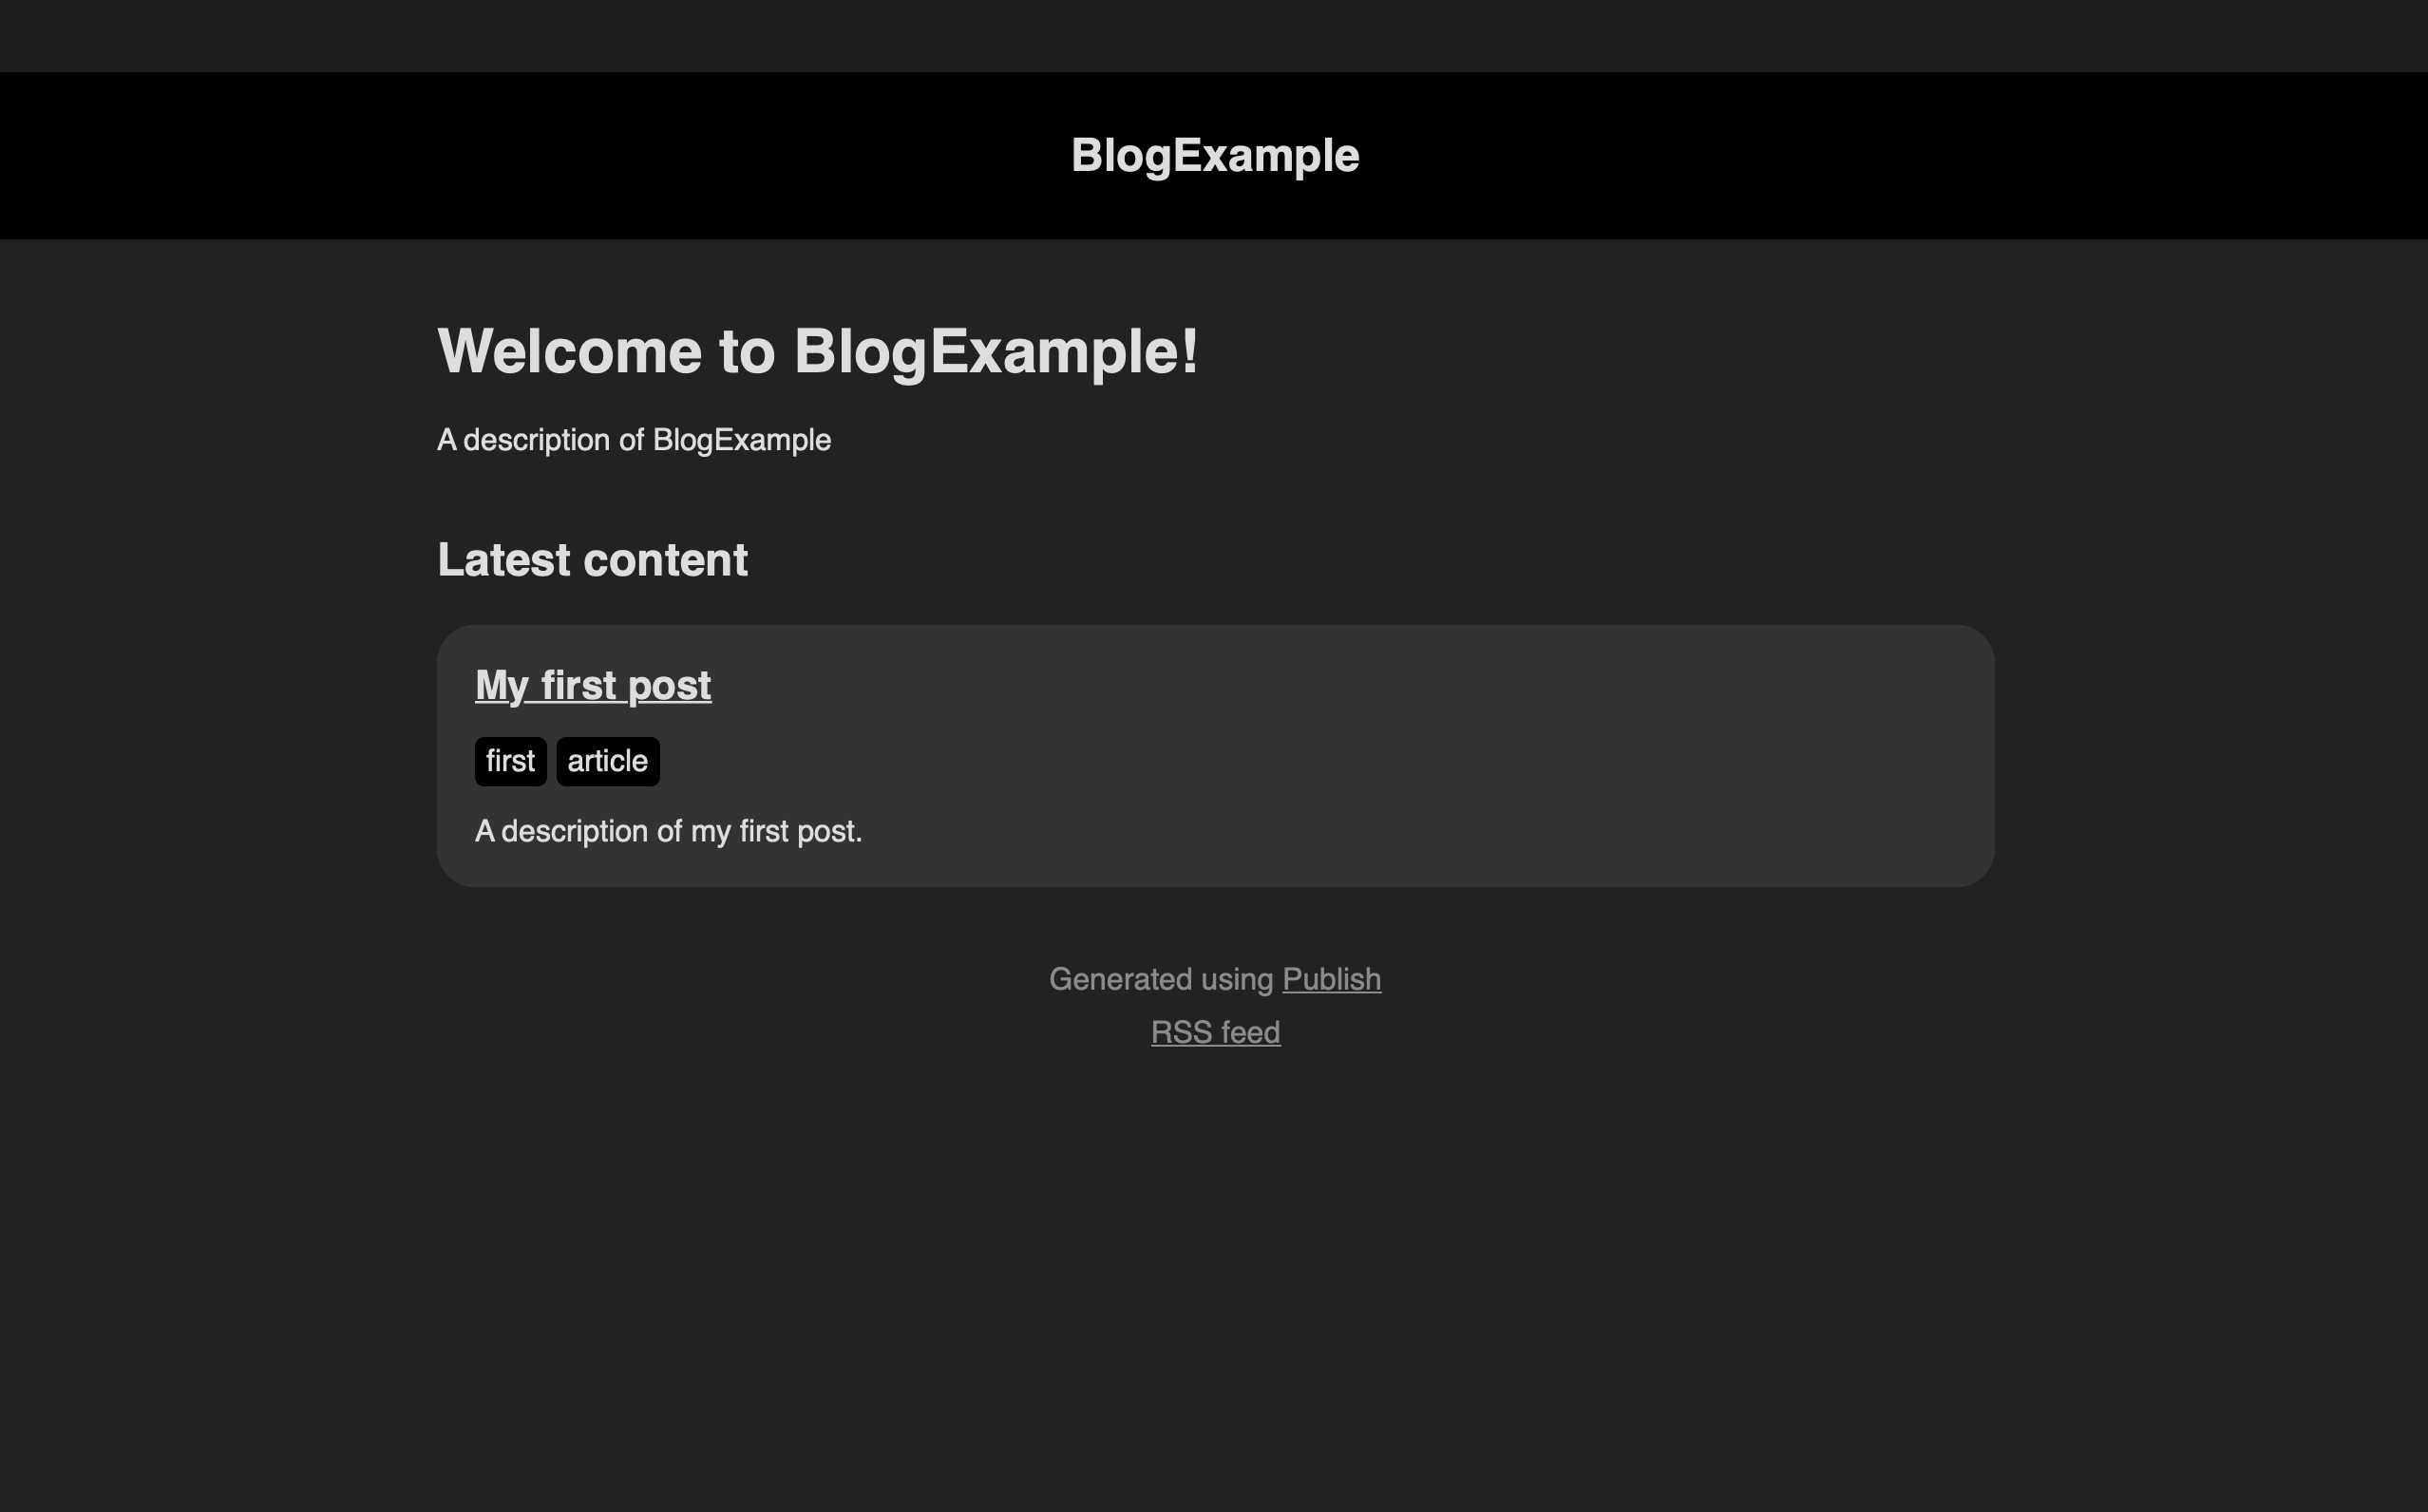
Let's launch your website! Now for those of you new to making websites, you don't just build it live on the web. First, you edit it and launch it locally on your computer where only you can see it. How do we do that? Go back to your terminal and run the command publish run. You'll see your terminal do a bunch of things, but the end is what we want. You should see a "Successfully published (your website)" and then a line under it stating "Starting web server at http://localhoste:8000". You can type this inside of a web browser of your choosing or just cmd + click it directly from the terminal. Viola! You have your first website that should look something like this.
Note: depending on the settings of your mac you may have a white background. Publish already adapts to light/dark theme based on the settings of your mac.
Personalizing your website
Now I promise we will get to adding content, but bear with me. I want to show you everything I can from start to finish so you understand most of the components in this package. The first step is personalizing this website to your liking.
Creating your own CSS file
Even though there are a lot of CSS styles built in, you're going to want to have full control over your CSS in your own website. Let's start by creating our own CSS file. Look over in your Project Navigator (that's the sidebar to the left that shows you all of your folders and files) and create a new folder in your Resources folder named MyTheme. Inside MyTheme, create a new file. You can either right click it and select New File or cmd + n after highlighting the folder. Name this file styles.css (yes, that means removing the Swift extension!). Now you can write all your CSS from Scratch, OR you can take what's already done for us and add then edit it as needed. To do the latter look in your project navigator under "Swift Package Dependencies" and navigate to "Publish>Resources>FoundationTheme>styles.css" and copy all of the CSS from there into the new CSS file you created. Here is an image to show you where you should be at right now.

Creating your own theme
I'm about to show you how to create your own theme, but let's first take a look at the default theme that comes with Publish called Foundation. In your Swift Package Dependencies section of your project navigator, navigate to "Publish > Sources > Publish > API > Theme+Foundation.swift". You should see a file that looks like this.
/**
*  Publish
*  Copyright (c) John Sundell 2019
*  MIT license, see LICENSE file for details
*/

import Plot

public extension Theme {
    /// The default "Foundation" theme that Publish ships with, a very
    /// basic theme mostly implemented for demonstration purposes.
    static var foundation: Self {
        Theme(
            htmlFactory: FoundationHTMLFactory(),
            resourcePaths: ["Resources/FoundationTheme/styles.css"]
        )
    }
}

private struct FoundationHTMLFactory<Site: Website>: HTMLFactory {
    func makeIndexHTML(for index: Index,
                       context: PublishingContext<Site>) throws -> HTML {
        HTML(
            .lang(context.site.language),
            .head(for: index, on: context.site),
            .body(
                .header(for: context, selectedSection: nil),
                .wrapper(
                    .h1(.text(index.title)),
                    .p(
                        .class("description"),
                        .text(context.site.description)
                    ),
                    .h2("Latest content"),
                    .itemList(
                        for: context.allItems(
                            sortedBy: \.date,
                            order: .descending
                        ),
                        on: context.site
                    )
                ),
                .footer(for: context.site)
            )
        )
    }

    func makeSectionHTML(for section: Section<Site>,
                         context: PublishingContext<Site>) throws -> HTML {
        HTML(
            .lang(context.site.language),
            .head(for: section, on: context.site),
            .body(
                .header(for: context, selectedSection: section.id),
                .wrapper(
                    .h1(.text(section.title)),
                    .itemList(for: section.items, on: context.site)
                ),
                .footer(for: context.site)
            )
        )
    }

    func makeItemHTML(for item: Item<Site>,
                      context: PublishingContext<Site>) throws -> HTML {
        HTML(
            .lang(context.site.language),
            .head(for: item, on: context.site),
            .body(
                .class("item-page"),
                .header(for: context, selectedSection: item.sectionID),
                .wrapper(
                    .article(
                        .div(
                            .class("content"),
                            .contentBody(item.body)
                        ),
                        .span("Tagged with: "),
                        .tagList(for: item, on: context.site)
                    )
                ),
                .footer(for: context.site)
            )
        )
    }

    func makePageHTML(for page: Page,
                      context: PublishingContext<Site>) throws -> HTML {
        HTML(
            .lang(context.site.language),
            .head(for: page, on: context.site),
            .body(
                .header(for: context, selectedSection: nil),
                .wrapper(.contentBody(page.body)),
                .footer(for: context.site)
            )
        )
    }

    func makeTagListHTML(for page: TagListPage,
                         context: PublishingContext<Site>) throws -> HTML? {
        HTML(
            .lang(context.site.language),
            .head(for: page, on: context.site),
            .body(
                .header(for: context, selectedSection: nil),
                .wrapper(
                    .h1("Browse all tags"),
                    .ul(
                        .class("all-tags"),
                        .forEach(page.tags.sorted()) { tag in
                            .li(
                                .class("tag"),
                                .a(
                                    .href(context.site.path(for: tag)),
                                    .text(tag.string)
                                )
                            )
                        }
                    )
                ),
                .footer(for: context.site)
            )
        )
    }

    func makeTagDetailsHTML(for page: TagDetailsPage,
                            context: PublishingContext<Site>) throws -> HTML? {
        HTML(
            .lang(context.site.language),
            .head(for: page, on: context.site),
            .body(
                .header(for: context, selectedSection: nil),
                .wrapper(
                    .h1(
                        "Tagged with ",
                        .span(.class("tag"), .text(page.tag.string))
                    ),
                    .a(
                        .class("browse-all"),
                        .text("Browse all tags"),
                        .href(context.site.tagListPath)
                    ),
                    .itemList(
                        for: context.items(
                            taggedWith: page.tag,
                            sortedBy: \.date,
                            order: .descending
                        ),
                        on: context.site
                    )
                ),
                .footer(for: context.site)
            )
        )
    }
}

private extension Node where Context == HTML.BodyContext {
    static func wrapper(_ nodes: Node...) -> Node {
        .div(.class("wrapper"), .group(nodes))
    }

    static func header<T: Website>(
        for context: PublishingContext<T>,
        selectedSection: T.SectionID?
    ) -> Node {
        let sectionIDs = T.SectionID.allCases

        return .header(
            .wrapper(
                .a(.class("site-name"), .href("/"), .text(context.site.name)),
                .if(sectionIDs.count > 1,
                    .nav(
                        .ul(.forEach(sectionIDs) { section in
                            .li(.a(
                                .class(section == selectedSection ? "selected" : ""),
                                .href(context.sections[section].path),
                                .text(context.sections[section].title)
                            ))
                        })
                    )
                )
            )
        )
    }

    static func itemList<T: Website>(for items: [Item<T>], on site: T) -> Node {
        return .ul(
            .class("item-list"),
            .forEach(items) { item in
                .li(.article(
                    .h1(.a(
                        .href(item.path),
                        .text(item.title)
                    )),
                    .tagList(for: item, on: site),
                    .p(.text(item.description))
                ))
            }
        )
    }

    static func tagList<T: Website>(for item: Item<T>, on site: T) -> Node {
        return .ul(.class("tag-list"), .forEach(item.tags) { tag in
            .li(.a(
                .href(site.path(for: tag)),
                .text(tag.string)
            ))
        })
    }

    static func footer<T: Website>(for site: T) -> Node {
        return .footer(
            .p(
                .text("Generated using "),
                .a(
                    .text("Publish"),
                    .href("https://github.com/johnsundell/publish")
                )
            ),
            .p(.a(
                .text("RSS feed"),
                .href("/feed.rss")
            ))
        )
    }
}
We are going to break this apart with our own custom theme to make it easier to understand and more organized. The first piece I want you to look at is the public extension on Theme.
public extension Theme {
    /// The default "Foundation" theme that Publish ships with, a very
    /// basic theme mostly implemented for demonstration purposes.
    static var foundation: Self {
        Theme(
            htmlFactory: FoundationHTMLFactory(),
            resourcePaths: ["Resources/FoundationTheme/styles.css"]
        )
    }
}
This creates a theme with a couple of arguments. The first being the HTMLFactory() and the second being a path to your CSS. Let's begin by creating our own theme that we can customize easily. Head to your project navigator and create a new Swift file called MyHTMLFactory.swift inside of Sources > BlogExample (or whatever your blog is named!). Now what we want to do is take all of these functions and separate them into their own files. I'll give you the bones of it here, but feel free to take them from Theme+Foundation and edit them as you see fit.
Inside MyHTMLFactory.swift add the following. (Note that I changed the struct name!)
import Publish
import Plot

struct MyHTMLFactory<Site: Website>: HTMLFactory {

}
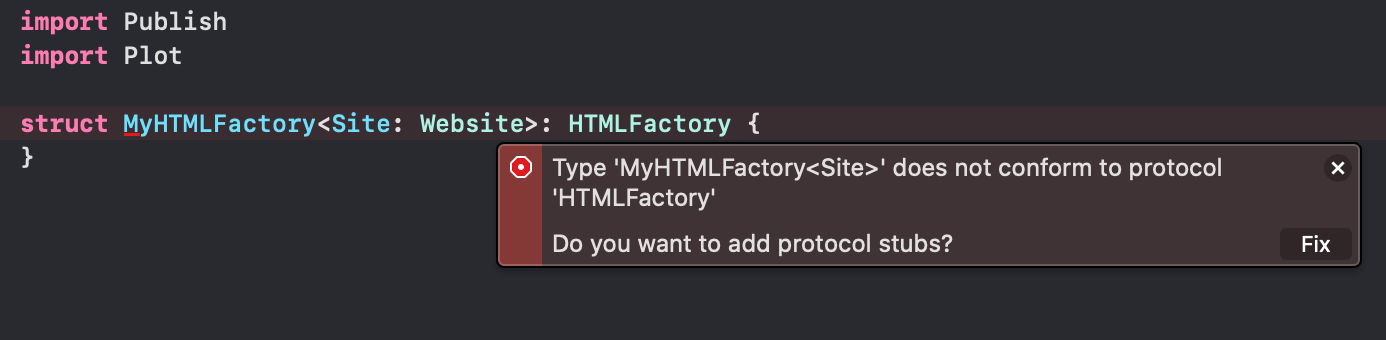
When you press cmd + b to build your app you should see an error. Type 'MyHTMLFactory<Site>' does not conform to protocol 'HTMLFactor'What's this? Well, MyHTMLFactory is actually a protocol that needs specific functions. If you're unfamiliar with protocols, they define a blueprint or methods and properties that you can allow other classes and structs to adopt. Here is what the protocol of MyHTMLFactory looks like.
import Plot

/// Protocol used to implement a website theme's underlying factory,
/// that creates HTML for a site's various locations using the Plot DSL.
public protocol HTMLFactory {
    /// The website that the factory is for. Generic constraints may be
    /// applied to this type to require that a website fulfills certain
    /// requirements in order to use this factory.
    associatedtype Site: Website

    /// Create the HTML to use for the website's main index page.
    /// - parameter index: The index page to generate HTML for.
    /// - parameter context: The current publishing context.
    func makeIndexHTML(for index: Index,
                       context: PublishingContext<Site>) throws -> HTML

    /// Create the HTML to use for the index page of a section.
    /// - parameter section: The section to generate HTML for.
    /// - parameter context: The current publishing context.
    func makeSectionHTML(for section: Section<Site>,
                         context: PublishingContext<Site>) throws -> HTML

    /// Create the HTML to use for an item.
    /// - parameter item: The item to generate HTML for.
    /// - parameter context: The current publishing context.
    func makeItemHTML(for item: Item<Site>,
                      context: PublishingContext<Site>) throws -> HTML

    /// Create the HTML to use for a page.
    /// - parameter page: The page to generate HTML for.
    /// - parameter context: The current publishing context.
    func makePageHTML(for page: Page,
                      context: PublishingContext<Site>) throws -> HTML

    /// Create the HTML to use for the website's list of tags, if supported.
    /// Return `nil` if the theme that this factory is for doesn't support tags.
    /// - parameter page: The tag list page to generate HTML for.
    /// - parameter context: The current publishing context.
    func makeTagListHTML(for page: TagListPage,
                         context: PublishingContext<Site>) throws -> HTML?

    /// Create the HTML to use for a tag details page, used to represent a single
    /// tag. Return `nil` if the theme that this factory is for doesn't support tags.
    /// - parameter page: The tag details page to generate HTML for.
    /// - parameter context: The current publishing context.
    func makeTagDetailsHTML(for page: TagDetailsPage,
                            context: PublishingContext<Site>) throws -> HTML?
}
So we need to add these stubs. The great thing about Xcode, is it can automatically do it for us. Remember that error that popped up? Go ahead and click the red circle on the left side of the error and click "Fix".
This should add the following protocol stubs, but with no return values. Go ahead and fill the stubs with a simple return HTML to get started. Here's an example.
struct MyHTMLFactory<Site: Website>: HTMLFactory {
    func makeIndexHTML(for index: Index, context: PublishingContext<Site>) throws -> HTML {
        HTML(.text("Hello, index"))
    }

    func makeSectionHTML(for section: Section<Site>, context: PublishingContext<Site>) throws -> HTML {
        HTML(.text("Hello, section"))
    }

    func makeItemHTML(for item: Item<Site>, context: PublishingContext<Site>) throws -> HTML {
        HTML(.text("Hello, item"))
    }

    func makePageHTML(for page: Page, context: PublishingContext<Site>) throws -> HTML {
        HTML(.text("Hello, page"))
    }

    func makeTagListHTML(for page: TagListPage, context: PublishingContext<Site>) throws -> HTML? {
        HTML(.text("Hello, tag list"))
    }

    func makeTagDetailsHTML(for page: TagDetailsPage, context: PublishingContext<Site>) throws -> HTML? {
        HTML(.text("Hello, tag details"))
    }
}
Let's now navigate to our main.swift file (should be in Sources/BlogExample) and change it up a bit. The first change I want you to do is to add this extension. You may have to change BlogExample to whatever your blog is named. In fact, expect to do that from now on because I won't be reminding you again. We are also adding the CSS file that we created earlier to our resourcePaths.
extension Theme where Site == BlogExample {
    static var myTheme: Theme {
        Theme(htmlFactory: MyHTMLFactory(), resourcePaths: ["Resources/MyTheme/styles.css"])
    }
}
The next change is editing the last line to use your theme. It should look like this.
try BlogExample().publish(withTheme: .myTheme)
Note that if you can't automatically see .myTheme after adding the extension then buidling your website can allow it to autopopulate. Your final main.swift file should look like this. Feel free to run your website, but all you will see is "Hello, Index".
import Foundation
import Publish
import Plot

// This type acts as the configuration for your website.
struct BlogExample: Website {
    enum SectionID: String, WebsiteSectionID {
        // Add the sections that you want your website to contain here:
        case posts
    }

    struct ItemMetadata: WebsiteItemMetadata {
        // Add any site-specific metadata that you want to use here.
    }

    // Update these properties to configure your website:
    var url = URL(string: "https://your-website-url.com")!
    var name = "BlogExample"
    var description = "A description of BlogExample"
    var language: Language { .english }
    var imagePath: Path? { nil }
}

extension Theme where Site == BlogExample {
    static var myTheme: Theme {
        Theme(htmlFactory: MyHTMLFactory(), resourcePaths: ["Resources/MyTheme/styles.css"])
    }
}

// This will generate your website using the built-in Foundation theme:
try BlogExample().publish(withTheme: .myTheme)
| Creating your own nodes → |
|---|